12.30.2013

holiday sparkle: going nude for new years.


Are you scared of color? Maybe you plan on wearing a bold lip color, but still want to sport a striking eye look? Or possibly you are just tired of seeing the same classic silver and black smokey eye on New Years Eve? Whatever your situation, I have the answer. This look shows you how to go strikingly nude on New Year's Eve with out loosing one ounce of drama. As always please try this out with products already in your collection. Get your money's worth girlfriend! Also look out for my next post which will not feature a look, but all of my favorite products from 2013.

P.S. I still need help figuring out how to stop blogger from altering my eye color when I upload photos. Any help would be so appreciated!
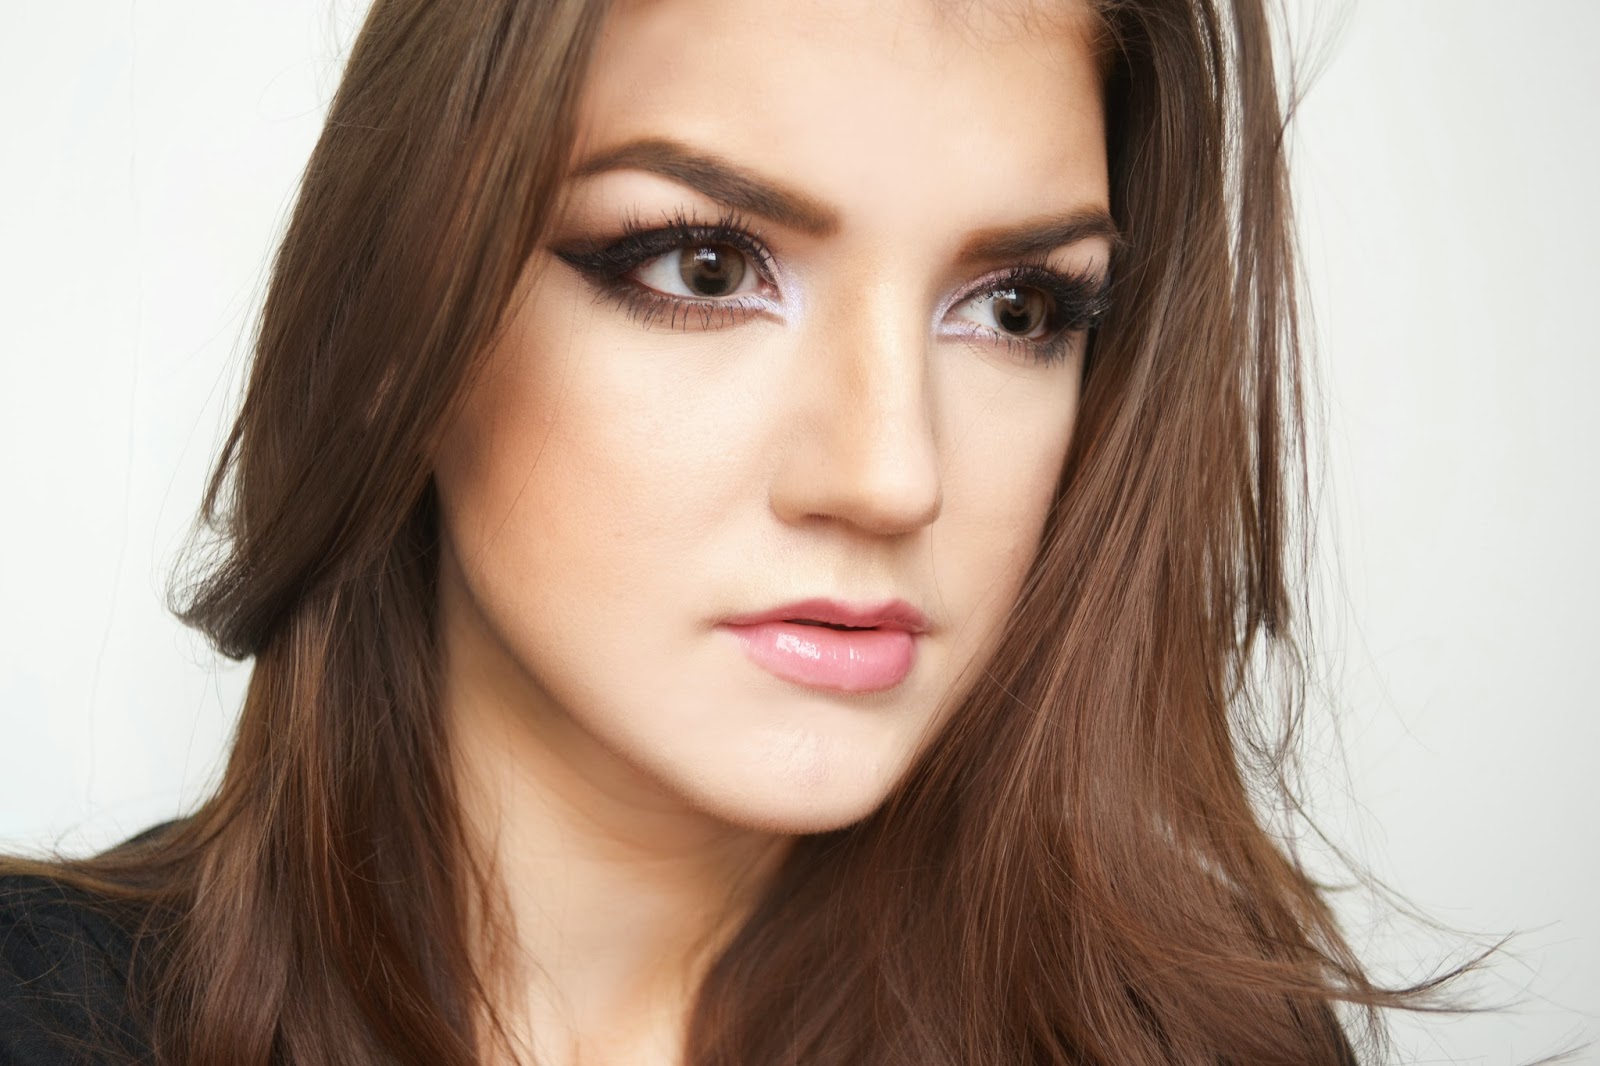

the eyes:

-As always, begin by priming your entire eye area with eye primer of choice. (Lorac Behind the Scenes Eye Primer)
-Next pack a shimmery champagne cream shadow across the lid, stopping at the crease. (Maybelline Color Tattoo #Barely Branded)
-On a fluffy brush mix both a taupe and mauve matte shade together and blend through the crease to serve as a transition shade. This will help other shadows after this blend more easily. (Lorac Pro Palette #Taupe & #Mauve)
-Then with an angled brush, pick up some of the taupe shadow and draw a line from the outer corner of your upper lashline outward (mimicking the shape of a winged liner). Then with the same bruch draw a line through your crease and connecting to the wing shape you just made. (Lorac Pro Palette #Taupe)
-With a blending brush, buff the edges of this taupe "triangle" inwards toward the lashline. 
-Using the angled brush again, mix a medium brown and dark brown matte shadow together and trace the lower lashline. When you reach the inner tear duct, disconnect from the lashline and draw the liner straight (refer to last picture in post for best explanation). This will leave a gap between the brown shadow and your inner tear duct. (Lorac Pro Palette #Sable & #Espresso)
-Pack a shimmery or holographic nude pigment all over the lid. I recommend using a mixing medium, water or setting spray to dampen your brush and increase color payoff when using any pigment. (L'oreal Infallible Eyeshadow #Strawberry Blond & NYX Matte Setting Spray)
-Next with a black gel liner, line the upper lashline and create a dramatic wing shape. (Maybelline Eyestudio Gel Liner #Blackest Black)
-To line the lower water line, apply a nude eyeline pencil to the inner third and a brown eyeliner pencil to the outer 2/3. (Rimmel Scandaleyes #Nude & Jordana 12hr Made to Last Liquid Eyeliner Pencil #Espresso Last)
-With a frosty or duo chrome pigment, place the product along the inner tear duct and neatly fill in the gap above the brown eyeshadow on the lower lashline. (Make Up Forever Star Powder #942 & NYX Matte Setting Spray)
- Next, highlight your brow bone with a matte shade a few steps lighter than your skin tone. (NYX Nude Matte Shadow #I Have a Headache)
-Apply your mascara of choice to top and bottom lashes. (Smashbox Photoop Eyebrightening Mascara & Too Faced Better Than Sex Mascara 
-For lashes I cut mine into tiny sections (about 1/4") and glued them on spaced apart for a piecey and fluttery look. (Ardell Demi #120)


the lips:

-I chose to keep the lips sheer and nude, to make the neutral eyes pop. However this look would also pair beautifully with any bold lip color you chose. (NARS Lipstick #Damage & Revlon Colorburst Lipgloss #Bejeweled)

other products used:

-Korres Mattifying Primer
-Lancome Teint Idole Ultra 24hr Makeup #Ivory
-L'oreal Truematch Concealer Crayon #N-1-2-3
-Revlon Colorstay Concealer #Fair
-NARS Light Reflecting Setting Pressed Powder #Translucent Crystal
-NYX Set It & Don't Fret It Matte Setting Powder #Light
-NYX Nude Matte Shadow #Tryst (as contour powder)
-Physician's Formula Bronze Booster #Light/Medium
-Revlon Powder Blush #Oh Baby Pink
-NARS Powder Blush #Albatross (highlight)
-Milani Brow Fix Kit #Light


 I hope you try this look out whether its for New Year's Eve or any night occasion. If you do want something with some more color check out the rest of my Holiday Sparkle Series featured here on the blog. Please tweet me a pic of your recreations or send it to me on any other social media (all my username info is listed to the top right of the screen). Don't forget to hastag #iamalizarin so I can see! Please have a safe and blessed New Year's and thank your for all your support in 2013!

FIN

12.23.2013

holiday sparkle: evergreen. everglam.


 You may or may not know that the Pantone Color of the Year 2013 was Emerald. While Sephora and Pantone collaborated to release several products featuring emerald green, many people are intimidated by the color. I thought that the color was perfect for this holiday season, reminiscent of the evergreen Christmas trees and incorporating the biggest color trend for 2013.

As always do try out this look with products already in your collection. Enjoy!


the eyes:

-First prime your eyes with your eye primer of choice. (Lorac Behind the Scenes Eye Primer)
-Next sweep a transition color through your crease that is very close to you skin tone. This will help all the colors we apply after blend more easily. (Urban Decay #Habit)
-With a flat shader brush, pack a shimmery emerald green shadow all over your lid. Make sure to stop at the crease. You can also use a setting spray, water or mixing fluid on your brush to make the eyeshadow standout even more. (Urban Decay #Damaged) (NYX Matte Setting Spray)
-Using a fluffy blending brush, sweep a warm tone brown shadow or bronzer through your crease. (Physician's Formula Bronze Booster #Light/Medium)
-With a smaller blending brush blend a warm purple shade through your crease. Do not blend it out past the warm brown, it should be contained with-in the crease. (Urban Decay #VooDoo) (NYX Matte Setting Spray)
-Next highlight underneath the brow bone with a matte shadow a few shades lighter than your skin tone. (NYX Nude Matte Shadow #IHaveAHeadache)
-For the inner tear duct, apply a shimmery gold shadow with a pencil brush. (Urban Decay Strike)
-On the inner 1/3 of the water line, apply a nude liner to keep the gold highlight bright. (Rimmel Scandaleyes Eyeliner #Nude)
-On the outer 1/3 of the water line apply a black water proof gel or eyeliner pencil. (Maybelline Eyestudio Gel Liner #Black)
-In the middle 1/3 of the water line, finish off with a purple eyeliner pencil. (Rimmel Scandaleyes Eyeliner #Purple)
-Using a flat definer brush, place the purple shadow again along the lower lashline to set the waterline liners from bleeding. (Urban Decay #VooDoo)
-With a black liner, line the upper lash line very thin and close to the lash line. I chose to skip the wing, but of course if your prefer you may go ahead and wing it out. (Maybelline Eyestudio Gel Liner #Black)
-Next, add your favorite lashes. (Ardell Demi 120)
-Lastly, coat your bottom lashes and blend the top lashes with the falsies with your mascara. (Smashbox Photo Op Eye Brightening Mascara)


the lips:

- For the lips, I opted for a sheer berry wash of color with lots of shine. (Maybelline Color Elixir #Amethyst Potion)

other products used:

-Rimmel Fix & Perfect Pro Primer
-Lancome Teint Idole Ultra 24hr Makeup #Ivory
-L'oreal Truematch Concealer Crayon #N-1-2-3
-Revlon Colorstay Concealor #Fair
-NYX Set It & Don't Fret It Matte Finishing Powder #Light
-Revlon Nearly Naked Pressed Powder #Fair
-Prestige Brow Perfection Brow Pencil #Med/Deep
-Milani Brow Fix Kit #Light
-Prestige Brow Perfection Clear Brow Gel
-NYX Nude Matte Shadow #Tryst (as contour powder)
-Physician's Formula Bronze Booster #Light/Medium
-Benefit Box Powder Blush #Rockateur
-MAC Mineralized Skin Finish #Lightscapade


As always if you try this out for yourself please tweet me a pic or send me something on my other social media which is listed to the top right of the blog. Don't forget to hashtag #iamalizarin so I can see! Please leave any comments or requests in the comment section below or on social media.

FIN


12.16.2013

holiday sparkle: let it glow.


Alright, so I'm back again for you with another holiday inspired makeup look. Perfect for the many festivities this year, no matter what you choose to celebrate. This look is full of silver and shimmer, topped off with violet hues that will make brown and green eyes pop, and a fresh complexion. I hope you enjoy and as always do try out the look with things already in your stash!


the eyes:

-As always, start by applying your eye primer of choice over the entire lid. (Lorac Behind the Scenes Primer)
-Next, pack a shimmery silver shadow over your entire lid. (Urban Decay #Shellshock)
-Then, deepen up the outer half of the lid with a shimmery violet shadow. (Urban Decay #Betrayal)
-To define the crease, blend a matte light grey shadow through the socket. (Nars And God Created The Woman Palette.)
-As always, highlight the browbone with a matte shadow a few shades lighter than your skin tone. (NYX Nude Matte Shadow #I Have a Headache)
-Then create a winged liner along your upper lash line with a black gel or liquid liner. (Lorac Pro Cream Liner #Black)
-Next, apply a shimmery iridescent pigment or shadow to your inner tear duct. (Makeup Forever Star Powder #942)
-Go ahead and deepen up the outer corner of the lid just slightly with a dark grey or black shadow. (Urban Decay #Smokeout)
-Then tight-line your upper lashline with a waterproof black eyeliner pencil. (Jane Cosmetics Water Resistant Eyeliner #Black)
-Along your lower waterline place a eggplant or purple waterproof liner. (Rimmel Scandaleyes Eyeliner #Purple)
-Using a flat definer brush sweep the shimmery purple shadow along the inner third of the lower lash line. (Urban Decay #Betrayal)
-With the same brush apply the dark grey or black shadow along the outer 2/3 of the lower lash line. (Urban Decay #Smokeout)
-If you like, you may now apply your false lashes of choice. (Ardell 120 Demi)
-Lastly, make sure to give all of your lashes a good coat of mascara. (Smashbox Photoop Eye Brightening Mascara)


the lips:

-Keep things simple and nude with a glossy pale lipstick of your choice. (Dior Addict Lipstick #Rose Deshabille)

other products used:

-Rimmel Fix & Perfect Pro Primer
-Laura Mercier Oil Free Supreme Foundation #Blush Ivory
-L'oreal Truematch Super Blendable Concealer Crayon #n-1-2-3
-NYX Set It & Don't Fret It Matte Finishing Powder #Light
-Revlon Nearly Naked Powder #Fair
-Milani Brow Fix Kit #Light
-Prestige Brow Perfection Revitalizing Clear Brow Gel
-NYX Nude Matte Shadow #Tryst (as contour powder)
-Physician's Formula Bronze Booster #L/M
-Nars Powder Blush #Sin
-MAC Mineralized Skin Finish #Lightscapade


There you have it! I hope you guys enjoyed and if you do try this out for yourself please tweet or instagram me a pic! Don't forget to hashtag #iamalizarin so I can see! Also, please do leave any comments or requests of things you would like to see below. Happy Holidays!

FIN

12.02.2013

a look: a touch of romance


This is actually the look I wore on Thanksgiving to lunch with my family. It is inspired by the dusty rose/mauve eyeshadow duo from NARS called Charade. I absolutely love NARS shadows and highly recommend them if you are willing to purchase a high end product. However, please do search your own collection as always and switch out products you already have to achieve this look. To me this look is subtle, romantic, and very day time appropriate. Also, the purple tones used on the eye will greatly enhance honey colored eyes like mine or green eyes. 

On a side note I am having some issues with blogger. When I upload certain photos it changes my eye color to this dark muddy color that is not in the photo. If you know why or how to fix this pleaseeeeeeeeeeee help a sister out and let me know in the comment section below. Enjoy!


the eyes:

-As always, start by priming your lids with your favorite eye shadow primer. (Lorac Behind the Scenes Primer)
-Using a dusty purple shadow pack this shade all over the lid, stopping at the crease. (NARS Eyeshadow Duo #Charade)
-With a dusty rose matte shadow on a fluffy brush, blend this color through the crease. (NARS Eyeshadow Duo #Charade)
-Next, highlight your brow bone with a matte shadow a few shades lighter than your skin. (NYX Nude Matte Shadow #I Have a Headache)
-Then line your tightline with a black waterproof eyeliner pencil. This will make your eyelashes appear thicker. Also drag this pencil very close to the outer half of your upper lashline. (Jane Water Resistant Eyeliner #Black & Jordana 12hr Made to Last Liquid Eyeliner Pencil #Black Point)
-Line your waterline with a waterproof purple eyeliner pencil. (Rimmel Scandaleyes #Purple)
-Next take a shimmery taupe shadow and place this on your inner tear duck and along your lower lash line with a detail brush. (Prestige Longterm Relationship Eyeshadow #Bewitched)
-Lastly apply several coats of your favorite mascara. I skipped out on the falsies and opted for my natural lashes today. ( L'oreal Lash Out Butterfly Mascara #Blackest Black & Too Faced Better Than Sex Mascara)

the cheeks:

-Sweep a contour powder or matte brown eyeshadow under your cheekbones to chisel out those cheeks. (NYX Nude Matte Shadow #Tryst)
-Next, warm up the perimeter of your face and neck with your favorite bronzer. (Physician's Formula Bronze Booster #Light/Medium)
-Then blend a purple/mauve blush along your cheek bones (not the apples of your cheeks) and up around the eye in a c-shape motion. Be sure to use a light hand and blend completely so this will not look like a bruise. (NARS Powder Blush #Sin)
-Lastly, give your self a marvelous glow by sweeping a gold toned powder highlight over the tops of your cheek bones, orbital bone, and cupids bow. (NARS Powder Blush #Albatross)


the lips:

-Finish off the look with a romantic pink lip. I chose a shade with lots of shine and a hint of shimmer to make the lips appear more full. (Dior Addict Lipstick #260 Rose Deshabille)

other products used:

-Rimmel Fix & Perfect Pro Primer
-Garnier Skin Renew BB Cream for Combo/Oily Skin #Light/Medium
-Revlon Colorstay Concealor #Fair
-NYX Mineral Set It & Don't Fret It Matte Finishing Powder #Light
-Prestige Brow Perfection Brow Pencil #Med/Deep
-Milani Brow Fix Kit #Light
-Prestige Brow Perfection Clear Brow Gel


That completes today's look. I hope you all enjoyed. I do try to keep my looks fairly simple so that you will not be afraid to master them at home! As always, if you do recreate this look please tweet or instagram me a pic! I would love to see it and don't forget to hastag #iamalizarin so I can see! Please do leave any requests you have below in the comment section or on any of my social media which is all listed to the top left of the screen.

FIN