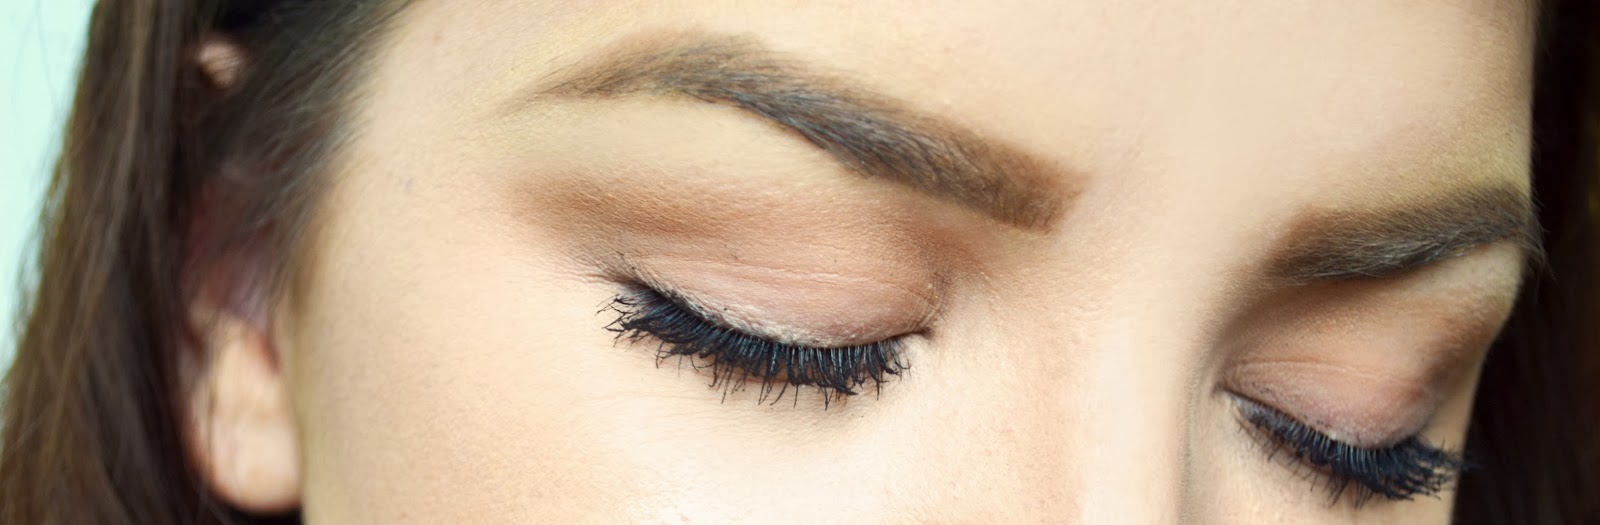
11.25.2013

a look: down and dirty


So this look is not literally dirty, but it is a beautiful earthy smokey eye. This look is very easy to achieve. It was my go to look all last winter and I am sure you all will see me sporting it on many occasions this year as well. I will say that for the day time I also like to skip all the steps for the bottom lash-line and it give the look a totally different perspective. This look will look amazing on any skin tone and eye color. As always do try this out with things you have currently in your collection and make them work for you!


the eyes:

-As always start by priming your eye lids with your favorite eye primer. (Lorac Behind the Scenes Primer)
-Next apply a black cream base or soft eyeliner pencil all over your lid, stopping at your crease. (Jordana 12hr Made to Last Liquid Eyeliner Pencil #Black Point)
-Now pack a matte dark brown eye shadow all over the black cream base you put down. (L'oreal HIP Eyeshadow Duo #Shady)
-Using the same brown eye shadow on a fluffy crease brush blend this through your crease. This will create a nice transition because the black base that was applied on the lid will give the brown shadow a deeper tone.
-Next, pack a matte shadow a few shades lighter than your skin-tone along your brow bone to help visually lift the arch of your brow.  (NYX Nude Matte Shadow in #05 I Have A Headache)
-With a black waterproof eyeliner tight line your upper lash line. (Jane Cosmetics Water Resistant Eyeliner in Black)
-Using a dark brown waterproof eyeliner to line your waterline. (Jordana 12hr Made to Last Liquid Eyeliner Pencil #Espresso Last)
-Staying as close as possible line your upper lash line with a black eyeliner pencil. (Jordana 12hr Made to Last Liquid Eyeliner Pencil #Black Point)
-Next, using a flat definer brush smudge the same dark brown shadow you used on your upper lid along the outer 2/3 of your lower lash line.
-For the inner third and tear duct of your eye apply a shimmery taupe shadow. (Prestige Longterm Relationship Eye shadow  #03 Bewitched)
-Lastly coat your natural lashes with a healthy coat of mascara. (L'oreal Lash Out Butterfly Mascara #Blackest Black & Too Faced Better Than Sex Mascara)


the brows:

Since this look is quite dark, please please pleaseeeeeeeeeee don't forget to fill in your eyebrows. If you don't this eye look can easily be too heavy for the rest of your face. The brows are the frame for your entire face so show them some love! Okay end rant.

-First, fill in and define your brows with a brow pencil that is closest to your hair color. (Prestige Brow Perfections Brow Pencil #Med/Deep)
-Next, set the brow pencil with a brow powder. I used the lightest color in the kit mixed with the dark color for the front of my brows, and the dark color alone on the tail end of the brow. (Milani Brow Fix Kit #01 Light)
-Lastly, don't forget to set your work with a clear brow gel to insure your don't get any rogue brow hairs throughout the day! (Prestige Brow Perfection Clear Brow Gel)

the lips:

-First apply a pinky nude lipstick to your entire lip. (MAC Lipstick #Flair for Finery)
-Lastly apply a warm nude gloss to your lips for some extra dimension and shine. (Nars Lipgloss #Chihuahua)


other products used:

-Rimmel Fix & Perfect Pro Primer
-Garnier Skin Renew BB Cream for Combo/oily Skin #Light/Medium
-Maybelline Superstay 24hr Concealor #Ivory
-NYX Mineral Set It & Don't Fret It Matte Finishing Powder
-NYX Nude Matte Shadow #07 Tryst (used as contour powder)
-Physicians Formula Bronze Booster #Light/Medium
-Wet & Wild Blush #Berry Shimmer
-MAC Mineralized Skin Finish #Lightscapade

That's All Folks! I hope you guys try this look out. It would be beautiful for any occasion. As always if you try this out for yourself please tweet or instagram me a pic. Don't forget to hashtag #iamalizarin.

11.24.2013

a look: berry by day


Okay okay.. So my hiatus is over. I do apologize. But I am not going drone on with excuses, so lets just get into it. After a recent post on instagram featuring this look (which by the way if you don't follow me you should @gnombusiness or @iamalizarin), I decided to do a two installment post on berry lips. This look features the ever popular Rebel lipstick by MAC. Today's installment will be for a daytime look and a second installment will come in another post for a berry night look.


the eyes:

- First, apply an eye primer of your choice to your entire lid. (Lorac Behind the Scenes Primer)
-With a fluffy blending brush, sweep a transition color about one shade darker than your skin tone through your crease do give your eyes socket some definition. ( Loreal Hip Eyeshadow Duo in Shady)
-Next pack a shadow one shade lighter than your skin tone over your lid and brow bone. (NYX Nude Matte Shadow in 05 I Have a Headache)
-Tight-line your upper lash-line with a black water proof eyeliner. (Jane Cosmetics Water Resistant Eyeliner in Black)
-Line the inner 1/2 of your waterline with nude eyeliner pencil. (Rimmel Scandaleyes Eyeliner in Nude)
-For the outer half of the waterline, apply a dark brown eyeliner. (Jane Cosmetics Water Resistant Eyeliner in Brown)
-With a flat definer brush smudge a matte brown eye shadow along the outer 2/3  of your lower lash line. (NYX Nude Matte Shadow in Tryst)
-Then create a wing along your top lash-line with a black liquid eyeliner or eyeliner pen. (L'oreal Infallible Super Slim Liquid Eyeliner in Black)
-Lastly, coat your top and bottom lashes with mascara. (L'oreal Lashout Butterfly Mascara in Blackest Black & Too Faced Better Than Sex Mascara)


the lips:

-First line your lips with a dark berry lip liner. (Jordana Easy Liner for Lips in Cabernet)
-Then fill in the center of your lips with a berry toned lipstick. (MAC lipstick in Rebel)
-Lastly if needed clean up around the edges with your concealer or some powder on a angled brush.


There you have it, berry lips appropriate for the day-time or anytime and right on trend for the season. I hope you guys enjoy this look and try it out for yourself. Remember to try it with products that are already in your collection if possible. If you do try it at home please tweet or instagram me a pic of the look! #iamalizarin

products on the rest of my face:
-Rimmel Fix & Perfect Pro Primer
-Lancome Teint Idole Ultra 24hr Makeup #Ivory
-Revlon Colorstay Concealor #Fair
-NYX Mineral Set it & Don't Fret It Matte Finishing Powder #Light/Medium
-Prestige Brow Perfection Pencil #Medium/Deep
-Physicians Formula Bronze Booster #Light/Medium
-Revlon Powder Blush #Naughty Nude
-MAC Mineralized Skin Finish #Lightscapade


FIN

10.30.2013

halloween celebration: ghostly geisha.


Many of you may already be familiar with Geisha culture, thanks to movies such as, Memoirs of a Geisha. However for those of us who are not.... In Japanese culture, a Geisha, is a woman entertainer and hostess that is skilled in many different areas of the arts. The Geisha culture evolved over time to include the beauty obsessed elite of Japan. Geisha have their own set of beauty ideals that include pail skin and   graphic makeup aesthetic. While the look I am sharing with you today is not traditional Geisha makeup, it is bright, colorful, and striking enough to fair well on any Halloween night. I plan to explore traditional Geisha makeup techniques in a future series. I hope you enjoy!

As always, try to use things in your current collection. Switch colors out to suit your costume and get
creative!


the skin:

-First apply a white cream base to your entire face. (NYX Jumbo Pencil in Milk)
-Next, set with translucent face powder. (Covergirl True Radiance Face Powder in Translucent)
-Now you will need several different color eye shadows that complement each other. I used a matte orange, a dark purple, and a light iridescent purple. 
-First apply one of the colors, I started with the dark purple, to your temple area and blend upwards around the side of your forehead and up over the arch and tail area of your brows.
-With the second color, I chose the matte orange, sweep the shadow all along your cheek bones and leave the apples white.
-Using the last of the three colors, the iridescent purple, blend this over the tops of your cheek bones, and along your brow bone.
(Layering these in such a way should give the look more depth.)

the brows: 

-Using a black gel eyeliner, draw in sharp, flat and upturned brows above your natural brow that should be covered with white cream base and shadow at this point. (Lorac Pro Cream Liner in Black)

the eyes:
-Pack a shimmery white shadow all over your lid.
-Second, blend the orange shadow lightly along your lower lashline.
-Next, with the black gel liner draw an exaggerated winged liner taking the wing almost to your hair line. Also you can add the front wings and connect them over the nose as I did for fun if you like. (Lorac Pro Cream Liner in Black)
-Lastly, apply your favorite mascara to the top lashes only. (L'oreal Butterfly Mascara in Blackest Black)


the lips:

-First make sure your lips are whited out with the cream base. (NYX Jumbo Pencil in Milk)
-Next, ignoring your natural lip lines, draw on a smaller bottom lip that is very rounded with a purple lipstick or lip liner. (Maybelline ColorSensational Lipstick in Violet Intrigue)
-Then repeat the same step on the top lip with a red lipstick, making sure to round out your cupids bow. (Revlon Colorburst Matte Balm in Standout)
-Finally, with your finger, apply a dark purple eyeshadow to the inner most part of your "new" lips.

There you have it folks! A colorful, ghostly pale geisha that is perfect for this Halloween! Please send me photos of any recreations your do on social media! Don't forget to hashtag! #iamalizarin


FIN

10.27.2013

halloween celebration: ventriloquist villain.


Continuing our celebration of Halloween this week is this look, which was inspired by a ventriloquist dummy. But I wanted to put a more villain-like twist on it. This look is colorful and festive all while being just the right amount of creepy. This is about interpretation not being perfect. Try it out with products you have in your own house! So lets begin.

the skin:

-First apply a white cream base to your entire face. (NYX Jumbo Pencil in Milk)
-Next, set with translucent face powder. (Covergirl True Radiance Face Powder in Translucent)
-With a small brush and matte black eye shadow draw lines from the corner of your mouth to your chin. Use a blending brush or your finger to blend the lines inward toward each other. (Black from the Lorac Pro Palette)
-Use the same shadow to draw a line under your cheekbones that with curve down toward your jaw line. Make sure to blend the shadow out. 
-Contour the sides of your nose using the black shadow, starting at the beginning of your brow and all the way down the bridge of your nose to the tip.
-With a red-brown shadow blend out the lines on your chin once more. (Garnet from the Lorac Pro Palette)


the cheeks:

- First using a small brush draw an imperfect circle on the apples of both of your cheeks with a matte black shadow. (Black from the Lorac Pro Palette)
-Next fill in the circles messily with a pink lip liner. (NYX Lip Liner in Sand Pink)
-Using your finger, dab a pink shadow over the lip liner. (Coax from the Urban Decay Vice 2 Palette)
-Also using your finger apply the reddish shadow over that. (Garnet from the Lorac Pro Palette)

the lips:

-First using a black gel liner and a detail brush draw the outline of your lips. When you reach the corners extend way past them in the shape you see above. (Lorac Pro Cream Liner in Black)
-Next fill in your lips and lip extensions with a red lip liner. (NYX Lip Liner in Hot Red)
-Then fill in your lips and lip extensions with a red lipstick. (Revlon Just Bitten Kissable Balm Stain in Romantic)
-Using your finger tap the red shadow from before on the perimeter of your lips messily, leaving the center open. (Garnet from the Lorac Pro Palette)


the brows:

-Draw on your brows with a high arch and long tail using a black gel liner. (Lorac Pro Cream Liner in Black)

the eyes:

-Pack a sparkly black shadow all over your lid. (Lovesick from the Urban Decay Vice 2 Palette)
-Blend the red brown shadow heavily through your crease and up almost to your brow bone. (Garnet from the Lorac Pro Palette)
-Pack a pink shadow along your brow bone and blend it into the red. (Coax from the Urban Decay Vice 2 Palette)
-Line your waterline, tight-line, upper and lower lash lines with a black pencil liner. (Urban Decay 24/7 Liner in Zero)
-Blend the red brown heavily along your lower lash line. (Garnet from the Lorac Pro Palette)
-Blend the pink shadow very heavily far down under your eyes. (Coax from the Urban Decay Vice 2 Palette)
-Apply lashes of your choice. (Ardel Demi 102)
-Coat your lashes with your favorite mascara. (Smashbox Photo Op Eye Brightening Mascara)


FIN.

I hope you all enjoyed this look. I had so much fun doing it! Use your own products and just get into it don't be afraid. Be inspired! Have a blast on Halloween and tweet me pictures of your recreations. Don't forget to hashtag! #iamalizarin

10.22.2013

halloween celebration: kitty say meow.


For the next few posts I will take a break from my fall trends series in order to recognize a special holiday. This will be one installment of several for Halloween. Afterwards we shall continue with our regularly scheduled programming. Muahahhahahah.

Here in the United States we celebrate a tradition called Halloween, or All Hallow's Eve. It is a time designated for remembering the dead. On this night many spend their time trick-or-treating, during which people dress up in costumes of their choice and go door to door in their neighborhoods asking for candy. Carving Jack-o-lanterns, playing pranks, watching horror films and attending haunted houses are some of the many traditions that take place on this night. Today I have created a look for any of you who might plan on dressing up as a feline this year. Feel free to alter your colors to suit your costume. Have fun with it! Also this look is messy on purpose. Do not over think it. No kitty is perfect, especially on Halloween.  


the skin:

-First contour your face using a cool matte brown eye shadow. Sweep the color under your cheekbones and blend upwards. This is supposed to be hazy and very dramatic, not your everyday contour. Also apply the color to the sides of your forehead, down the sides of your nose, around your chin. (NYX Nude Matte Eye shadow in Tryst)
-Next buff a warm matte brown eye shadow along all of the same places. This will give the color some dimension. (Taupe from the Lorac Pro Palette)
-With a brown pencil eyeliner, draw a line from your tear duct down the side of your nose, and continue in an arch shape over your natural smile lines. Also draw the outline of the underneath of your nose and from the corners of your mouth down to your jawline. Blend the last two lines from your mouth messily with your finger. (Kat Von D Autograph Pencil in Immortal Love)
-Then proceed with the same liner to draw in whiskers above your lips and create a straight line connecting your nose to your cupids bow.
-Lastly for the skin, apply a matte white eye shadow very heavily in an upside down triangle under your eyes, around your top lip, down the bridge of your nose, and on the center of your forehead. (White from the Lorac Pro Palette)


 the brows:

-First apply concealer over your entire brow. This will probably not conceal them completely but it will make your natural brow less prominent. (Loreal True Match Super Blendable Concealor in C-1-2-3)
-Then take the same brown liner your used before and draw flicks resembling fur at the front of your brow. I did mine in two layers. The first layer I blended slightly with my finger, and the second layer I left alone. (Kat Von D Autograph Pencil in Immortal Love)
-Make sure to use the same matte white eye shadow as before to highlight right underneath your brow along your brow bone.

the eyes:

-First apply your favorite eye shadow primer as always. (Lorac Behind The Scenes Primer)
-Next pat a medium warm tone brown all over your lid, stopping at the crease. (Taupe from the Lorac Pro Palette)
-Then draw a line starting from the outer corner of your eye up almost to the tail of your brow using the brown liner pencil once again. (Kat Von D Autograph Pencil in Immortal Love)
-With a small detail eye brush, apply a darker matte brown shadow starting along the line you just drew and blend inwards to create a gradient effect. (Sable from the Lorac Pro Palette)
-Apply a black gel liner to your lash line and trace over the brown line you drew at the end of your eyeshadow to create a crisp barrier for the shadow. Then draw a second, smaller line underneath that starting from your the outter corner of your lash line. (Lorac Pro Cream Eyeliner in Black)
-Then using the brown liner pencil once again, run this under the outer third of your lower lash line. (Kat Von D Autograph Pencil in Immortal Love)
-Line your waterline with a black liner pencil. (Jane Cosmetics Water Resistant Eyeliner in Black)
-Now go back to the gel liner and use a tiny brush to draw in hairs along the sides of your nose, connecting them at the top to your inner tear duct. Make it messy. This is not a well groomed kitty.  (Lorac Pro Cream Eyeliner in Black)
-Apply fake lashes if you like. (Ardell 120 Demi)
-Lastly, apply a very thin coat of mascara to blend your real lashes with your fake ones on the top. Don't over do it. You want these lashes to remain fluffy and wispy. However on your bottom lashes apply a generous coat of mascara. (Loreal Butterfly Mascara in Blackest Black)


the nose:

-Since you have already started a guideline on your nose with the brown eyeliner, trace over that with a black gel liner and curve it underneath your nostrils. (Lorac Pro Cream Eyeliner in Black)
-Then pack on a dark matte brown just underneath the line. (Expresso from the Lorac Pro Palette)
-Next, blend that edge out with one shade lighter of matte brown shadow also blend this color messily over the straight line connecting your nose and your lips. (Sable from the Lorac Pro Palette)

the lips:

-First trace outside of your natural top lip line with the brown eyeliner, making sure to round the shape out. (Kat Von D Autograph Pencil in Immortal Love)
-Next go over that with the black gel liner and blend slightly with your finger. (Lorac Pro Cream Liner in Black)
-Tap a tiny bit of  concealer over your bottom lip to neutralize your natural lip color. (Maybelline Superstay Concealer in Ivory)
-Lastly take a red or reddish brown eye shadow and use your finger to tap that along the center of your top lip. (Garnet from the Lorac Pro Palette) 

And there you have it! Kitty Kitty Bang Bang. I hope you all have a wonderful and safe Halloween no matter what you are dressing up as. Please feel free to tweet me any requests you have at @iamalizarin and send me photos of your recreations! Don't forget to hashtag! #iamalizarin


Meow.

10.13.2013

fall trends: The Nudist


Fall can get lost in clouds of dark makeup and heavy vampy colors, but this year at New York Fashion Week many designers decided to break away from the berries and oxblood with a simple and glowing nude face. The look I have done for today is inspired by the look above from the Alexander Wang Show. But knowing this might be intimidating for some, I have taken it down a few notches to become a beautifiul everyday look. Other designers that went the nude route were Jenny Packham, Oscar de la Renta, and many others. I encourage you to look at shots from their show for other inspiration. 

As always do not feel as though you must go out and buy everything I used to complete this look. Find things that are similar in your current collection and get your money's worth out of them!


the eyes:

This look is reversed from what you would expect as it keeps only the lid bright and smokes out the crease all the way up to the brow. This might make some of your feel uncomfortable since most looks employ a highlighted brow bone. But I promise you, if you follow these steps carefully with a light hand you will end up with a subtle and sultry look.

-First, start by applying your favorite eye primer so your look will last all day. (Lorac Behind the Scenes Primer)

-Next, apply a golden/champagne color to your entire lid, stopping at the crease. (I mixed together Dope from the Vice 2 Palette and Half Baked by Urban Decay)

-Then you will want to blend a matte middle tone grey through the crease and all the way up to your brow bone. To do this start with a light hand and a little product. Build up slowly and make sure to blend thoroughly. (I used the matte mauvey grey tone from the Nars And God Created the Woman Palette.)

-To highlight your eyes pack a shimmery champagne color into your inner tear duct area. (I used Dope once again from the Vice 2 Palette)

-Create as thin a line as you can with a liquid liner along your natural upper lash line. Do not wing it out for this look. I prefer a liquid liner pen as it is easiest to control, and I highly suggest these for beginners. They are essentially a felt tip pen. (Maybelline Master Precise in Black)

-Tight line your upper lashes with a waterproof black eyeliner to make your lash line appear fuller. (I used Jane Cosmetics Water Resistant Eyeliner in Black.

-Finish by applying several coats of your favorite mascara to your top lashes only! (I used Benefits They're Real Mascara.)


the brows:

For the brows in this look, I skipped out on the brow pencil and only used a powder. 

-First slightly dampen an angled brush and dip it into your brow powder. If you do not have a brow powder, a matte brown eye shadow will work. Flick the brush vertically into your brow in a random pattern, as if your were drawing in individual hairs. This will give your brow a less blocky and full on shape.


the skin:

- For the cheeks first contour under your cheek bones with a cool tone brown powder. If you do not own a contour powder you can use a face powder a few shades darker than your skin tone or a matte eyeshadow. Also contour the sides of your forehead and be sure to blend everything completely. (NYX Nude Matte Shadow in Tryst)

-Next, apply a bronzer to your cheekbones as you would a blush (not on the apples of your cheek) and to the sides of your forehead directly over the contour powder. (Physicians Formula Bronze Booster in Light/Medium)

-To highlight, I suggest using a cream highlighter and applying with your fingers to the top of your cheekbones, down the bridge of your nose, and across your cupid's bow. (Benefit's Watts Up Highlighter) 


the lips: 

-First apply a nude lipstick that is suitable for your skin tone. (Revlon ColorBurst Lip Butter in Creme Brulee)

-Then top it off with a nude gloss for some extra dimension. (Maybelline Colorsensational Elixir in Nude Illusion) 

There you have it. Try going nude for this fall.. well you know what I mean. As always if you try out this look for yourself please send me a picture over twitter, instagram, or facebook. Dont forget to hastag! #iamalizarin 

If you are interested in the products on the rest of my face:

--Maybelline Instant Age Rewind Primer Skin Transformer
-Covergirl Outlast Stay Fabulous 3-in-1 Foundation in #805
-Maybelline Super Stay 24 Concealor in Ivory
-Loreal True Match Super Blendable Concealor C-1-2-3
-Revlon Nearly Naked Powder in Fair

10.07.2013

fall trends: Rachel Zoe's Bad Ass Lip


For New York Fashion Week 2013, Rachel Zoe opted for a brazen, multi-tasker aesthetic which she described as,"70's equestrian, then it gets super tough with baroque, medieval elements mixed in." Zoe wanted to steer clear of the girly image and go for something subtly masculine. Celebrity makeup artist, Charlotte Tillbury, gave her just that with fresh faced models sporting wine stained lips. The "bad ass lip", as Zoe refers to it, is definitely the statement of the look and can be easily achieved at home.


the lips:

To achieve Zoe's just bitten lips, all you will need is a red lip stick, and a darker plum lip stick. You wont believe how easy this is.

-First, apply the red lipstick (not a matte) using a lip brush to the entirety of your lips. This will provide a sheer wash of color rather than a full on red pout. If you do not own a lip brush, try dabbing the lipstick lightly on your lips and using your finger to move the color around. The lipstick I chose was Rich Ruby by Prestige Cosmetics.

-Next, apply the plum lipstick using the brush again to only the center of your lips. Start at the very middle and feather out slightly to your lip line. The lipstick I chose was Diva by MAC.

 the skin:

All you will need for this step is a cool toned contour powder (or cool toned brown eye shadow) and a blush or contour brush. Skip out on both bronzer and blush for this look, as we are going for a wintery fresh face. I chose NYX Nude Matte Shadow in the color Tryst.

-Lightly tap your brush into your product and lightly sweep the contour powder underneath your natural cheek bones. You will want to start at the top of the ear and glide down the hollows of your cheeks until the color is lined up with the end of your brow. Make sure to go back with no product on your brush and buff in light circular motions to assure everything is blended.

- Next, lightly apply the same powder to the temples and sides of your forehead. DO NOT apply to the top of your hair line. The goal is to slim the forehead, not to make it look dirty. Don't forget to go back and blend again.

*TIP: If you feel like you applied to much product, you can easily go back with the foundation brush you used previously or apply some face powder that matches your skin tone to that area to blend.
 the brows:

- This look calls for a more defined brow, which I achieved by lining them with a brow pencil (Prestige Brow Pencil in Light/Medium) and then filling in the entire brow with a brow powder (the darkest color in the Milani Brow Fix Kit 01 Light). I also carved out the arch of my brow with some concealor to clean up the line.

the eyes:

- First make sure to apply your eye primer of choice (Lorac Behind the Scenes Primer).

-Then take some of your regular face bronzer on a fluffy blending brush and blend this through your crease (Physicians Formula Bronze Booster in Light/Medium).

-Next, apply a shadow close to your skin tone to your entire lid (Habit from Urban Decay Vice 2 Pallete).

-If you feel comfortable, tight-line your upper lashes with a dark brown eyeliner (Jane Cosmetics Water Resistant Eyeliner in Brown). Also, line your lower water line with the same eyeliner. Then lightly run the eyeliner on the outer third of your lower lash line. Don't forget to blend that liner with a brush or lightly with your finger.

-Lastly, apply several coats of mascara to upper and lower lashes (Loreal Voluminous Million Lashes Excess in Blackest Black and Smashbox Photo Op Eye Brightening Mascara).

And there you go! The completed Rachel Zoe Bad Ass look, perfect for this fall. Because lets be honest here, Rachel is the trend. She would not lead you astray. As always I encourage you to try this fun and easy look out for yourself and send me a picture of your recreation! Don't forget to hashtag #iamalizarin

If you were interested in the products on the rest of my face:
-Maybelline Instant Age Rewind Primer Skin Transformer
-Covergirl Outlast Stay Fabulous 3-in-1 Foundation in #805
-Maybelline Super Stay 24 Concealor in Ivory
-Loreal True Match Super Blendable Concealor C-1-2-3
-Revlon Nearly Naked Powder in Fair